How to Photograph Really Big Things
Photos by Forrest and Donna Anderson
How do you photograph Really Big Things?
This question confronts not just professional photographers, but the millions of tourists who stand with their smart phones in front of Egyptian and Aztec pyramids, castles, cathedrals, mountains, canyons, valleys, bridges and other Really Big Things.
The central challenge is that light makes the photograph. If the light is perfect on an object, you can get a stunning photograph. If the item is backlit or it is a hazy day, you have trekked to the Egyptian desert or Stonehenge to walk away disappointed with poor quality photos that don’t look anything like the travel ones you saw on Instagram.
With many other kinds of photography, the photographer can control the light at least to some extent. You can move people or items around and shield them from harsh light by posing them in the shade or photographing them indoors. You can add artificial lighting in the form of a flash or lights. These photographs make up a huge percentage of good quality photography.
These options aren’t open to you when you are photographing Really Big Things – you can’t move the mountain or make the castle emerge from haze on a rainy day. So what do you do?
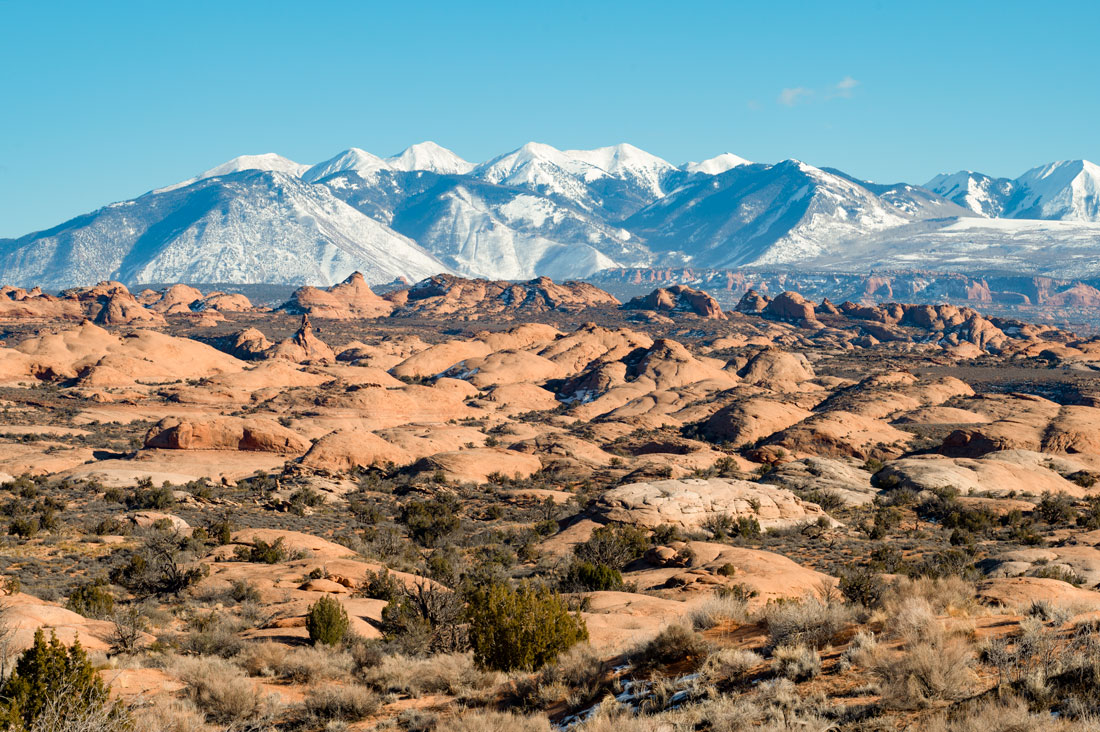
We headed to Arches National Park in southern Utah to explore this challenge. The park was a perfect laboratory to test our ideas about photographing Really Big Things, because it is chockful of world-class ten-story natural arches, rock formations and cliffs. Every year, 1.5 million people visit the park to photograph these iconic landscapes, which adds up to billions of either awe-inspiring or terrible photos.
We had taken our fair share of both types at the park, and we knew that the difference between great and awful/mediocre photos largely depends on the light.
Here’s what we found out:
Just because you can’t control the light on a Really Big Thing doesn’t mean it isn’t being controlled by nature. Natural light isn’t random. The weather, the earth’s movement around the sun, the earth’s rotation, the time of year, the time of day and the weather are all predictable elements that you can align yourself with to get the gorgeous photos you want. The key is figuring out how to use those natural processes to your advantage to remove as many obstacles to getting good photos as possible.
Let’s do it the wrong way first. After entering Arches National Park, the majority of tourists motor along on the scenic highway from one viewpoint or trailhead that features a major scenic feature to the next, photographing as they go. This is the best way to come away from your trip with mediocre, disappointing photos because while this approach may work logistically, it means that you will be photographing some features while they are backlit or obscured by deep shadows.
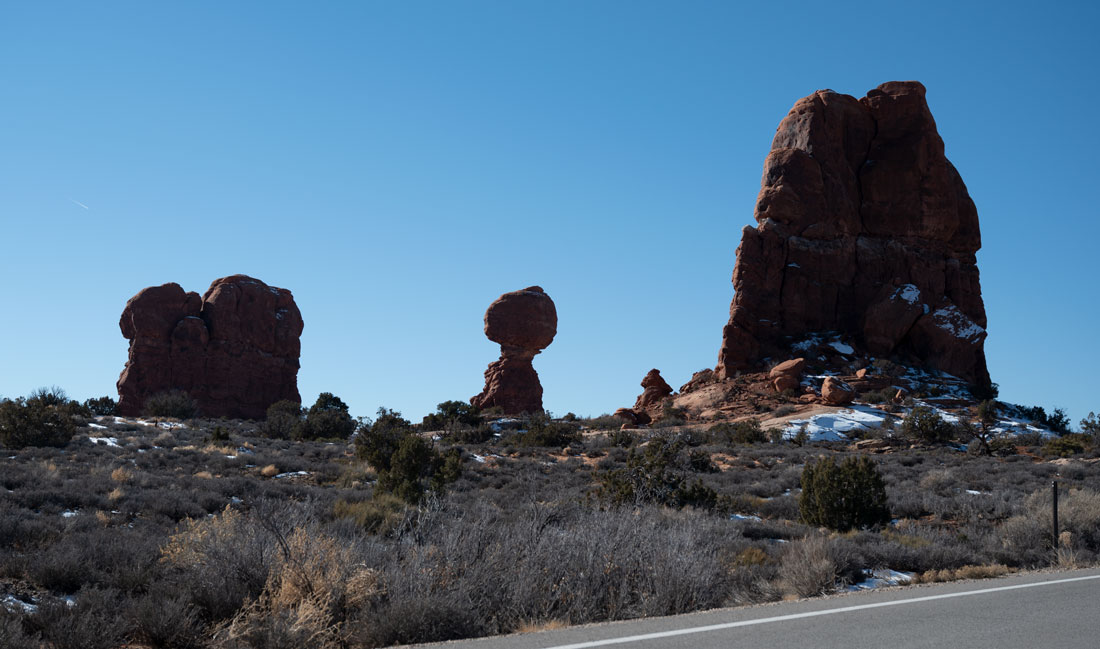
Can there be anything more wrong with this photo of the iconic Balanced Rock (center) shot from the scenic highway? The light's bad, the angle's bad, the framing's bad. Okay, so it is in focus...
There’s a far better way that can enable you to post National Geographic-quality photos that stun your friends and family with their color, composition, interest and informative value. This takes a bit of advance research and planning, but our general experience with travel is that you usually get just about as much out of a trip as the amount of advance research and planning you put into it. Let’s start with research:
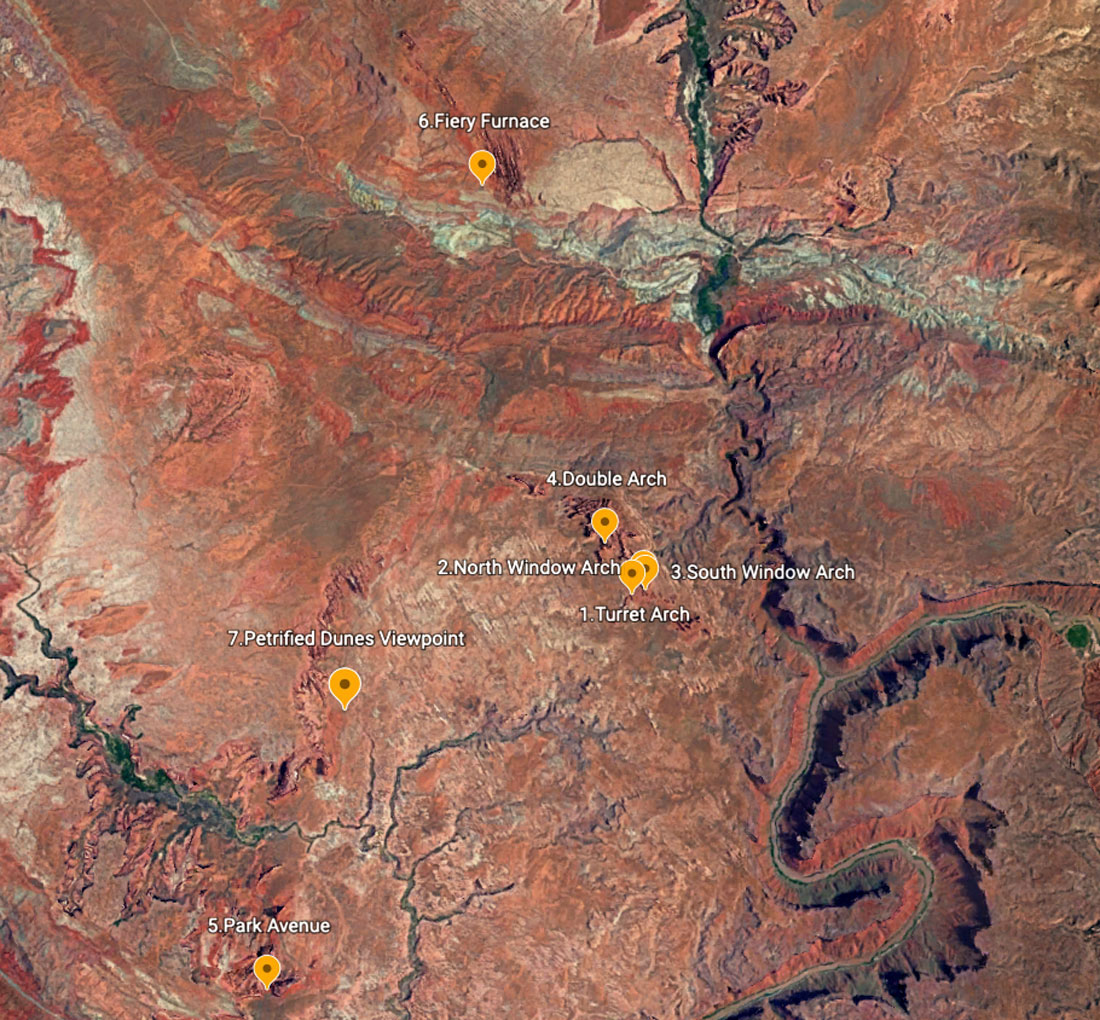
Start by identifying what you want to photograph. This begins with a good map marked with the scenic sites you want to visit. We created this app in Google Earth (not Google Maps), for reasons that will be explained below.
Once you have identified the sites you want to photograph, the next step is to google each one and collect some photos of the sites you plan to visit. I like to use a Pinterest board to collect photos while planning a trip. My husband saves them in an album on Instagram or in a trip folder on his computer. This gives you a vision of some photo possibilities for your trip and an idea of what to shoot.
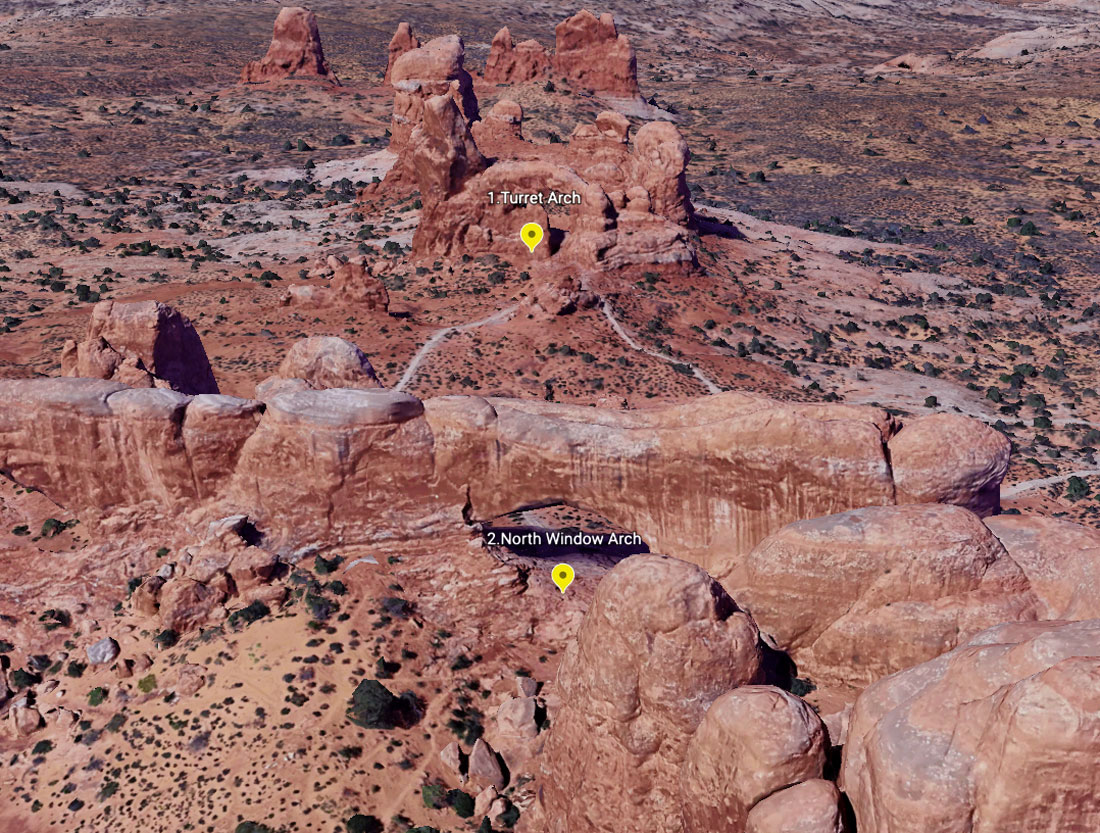
The next step is getting a feel for each site's position on the landscape in relation to the sun. The best way to do that is in Google Earth (This is a different Google web app than Google Maps). At first glance, Google Earth appears to look like Google Maps in the terrain view. Create a project for a trip to a location. You can place pins on the map for the features that you want to see and photograph. The power of Google Earth for photography is that for many locations, such as national parks, Google Earth gives you the option to see a three-dimensional view of topographical or architectural features. If you switch to 3D mode and use the shift key and the cursor or your mouse along with the + or – zoom option, you can move in on topographical features and digitally fly around them so that you can see what they look like. It’s like getting a flying drone view of an arch or cliff. This helps you become familiar with it and get a feel for where it is positioned and possible viewpoints from which you could photograph it.
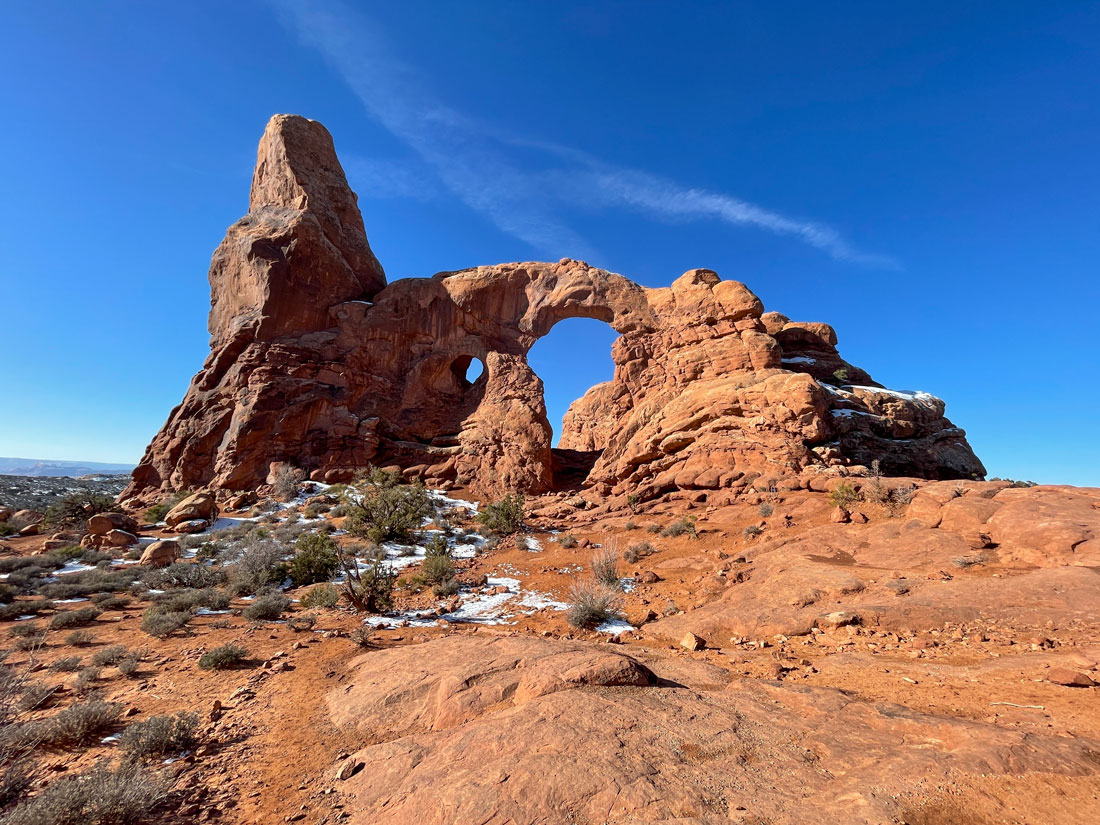
For example, we zoomed in on Turret Arch because we wanted to photograph it on our trip. In the process, we noted its location in relation to another arch - North Window Arch. Hold that thought - we will return to it shortly.
Next, determine the angle of the sun on that feature at any given time on any given day by using a smartphone app called Photopills. Within this app, you can search for the site. The app then shows you sunrise and sunset at the location and the angle of the sun between those two points at any hour of any day of the year. This helps you to see in the app when and if the sun will be at the right angle on your subject to be lighted at the time of year and day that you are planning to be at the site. This app enables you to make a list of the features you want to see and make a schedule of the time you want to be at each one on any given day.
Then check the weather, especially when you have options as to what day you want to visit a place. We checked the weather for several days and deliberately chose a sunny day to visit the park because bright sunlight is the best for Really Big Things like cliffs and arches on which you want to illuminate lines and textures. This is counterintuitive to portrait photography, where you typically want to avoid harsh sunlight that casts shadows over people’s eyes.
We also researched the way in which the features we wanted to photograph were formed. Natural features can be overwhelming and disorienting when you are standing in front of them, and it is easy to miss photographing key features that help you understand how they came to be.
How did this planning work for us on our trip to Arches National Park?
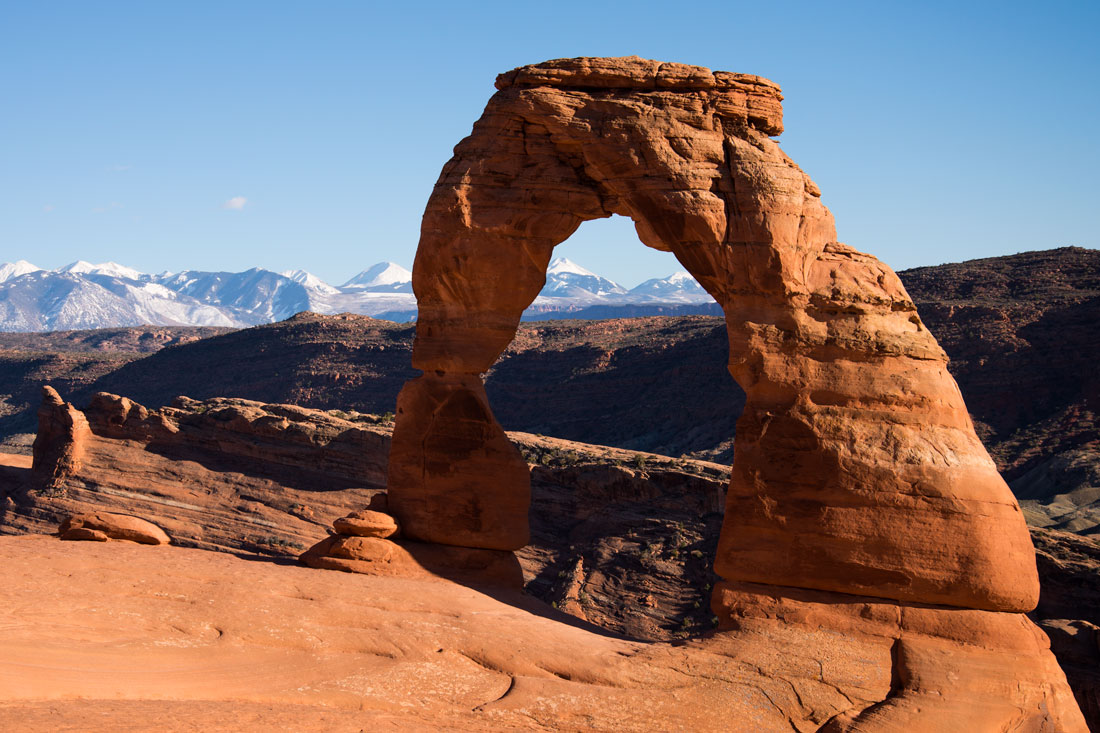
Photopills helped us to see that winter isn’t a good time of year to see some of Arches National Park's well-known features such as Delicate Arch and Landscape Arch because they are backlit in the winter. Since we live within three hours of the park and can return at any time to photograph those features, we crossed them off our list for now and concentrated on four scenic areas that are well lit at this time of the year.
We started our photo adventure with a long band of cliffs and arches midway through the park. By studying them on Google Earth and Photopills, we found that several in this area are well-lit at the following times of day in January:
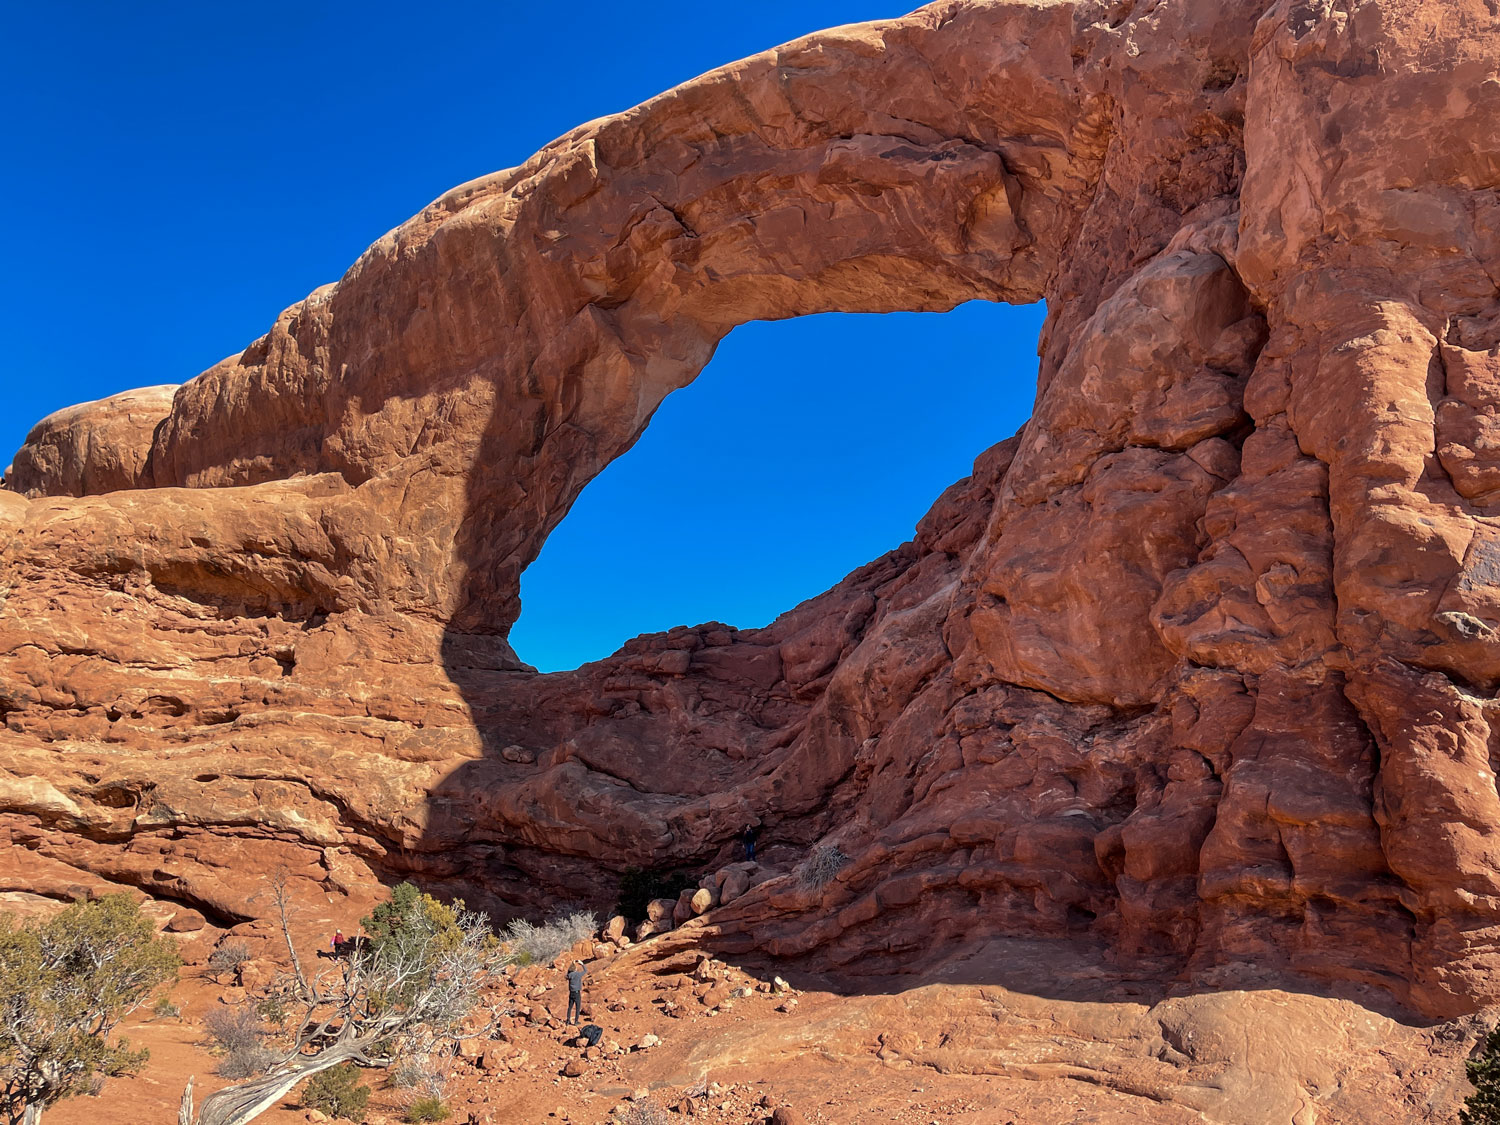
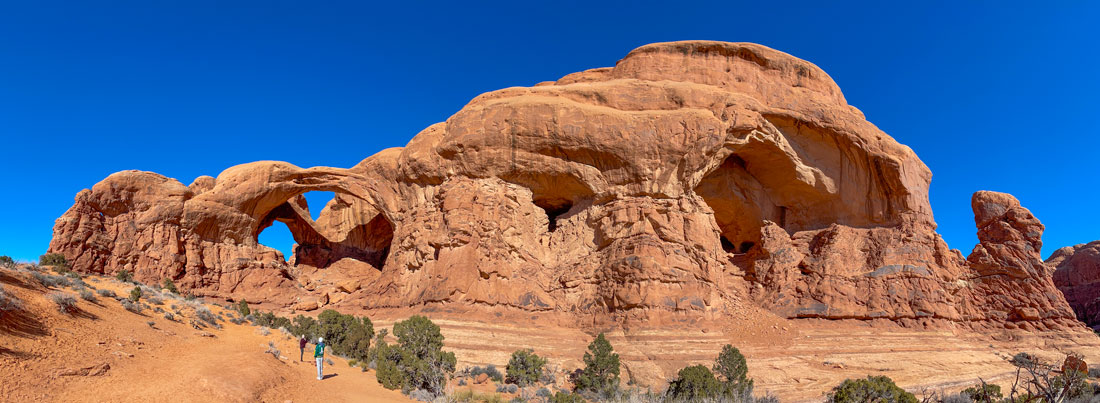
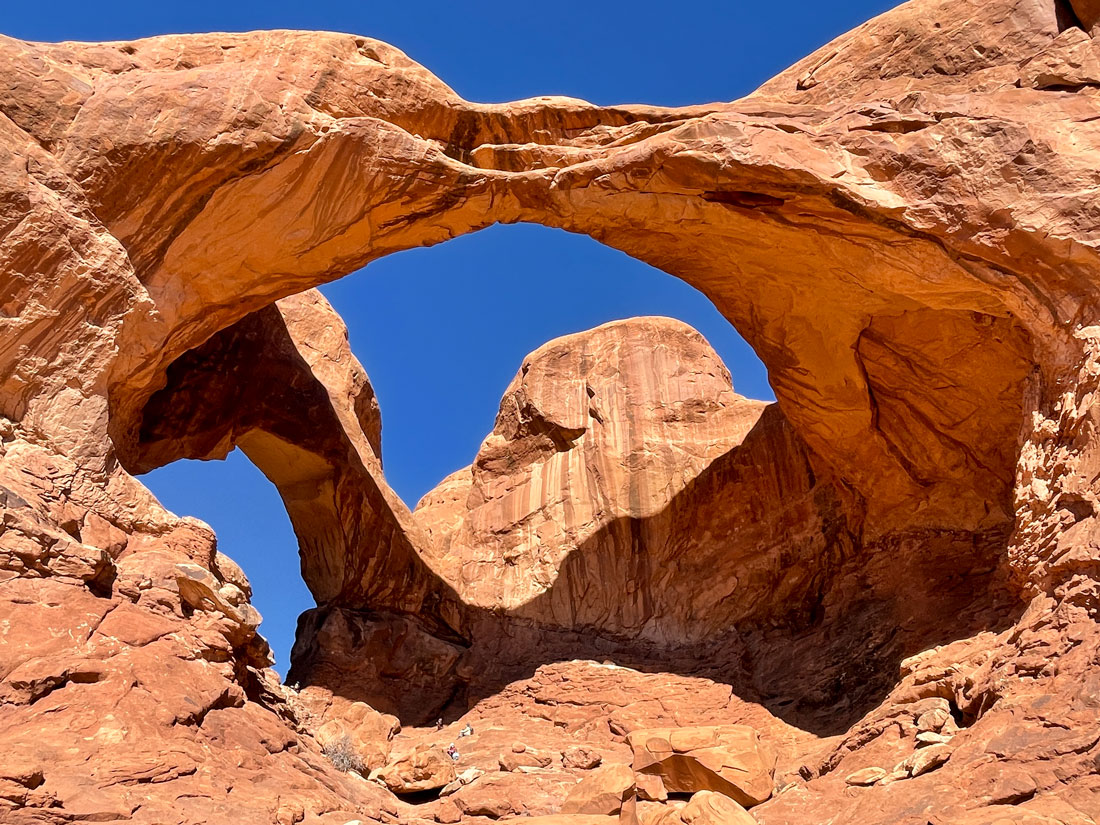
Turret Arch is beautifully lit shortly after sunrise, which at this time of year was about 9 a.m. By this time, the sun had risen above the horizon and had lit both the arch and also an iconic view of the arch through North Window, another prominent arch that is close by.
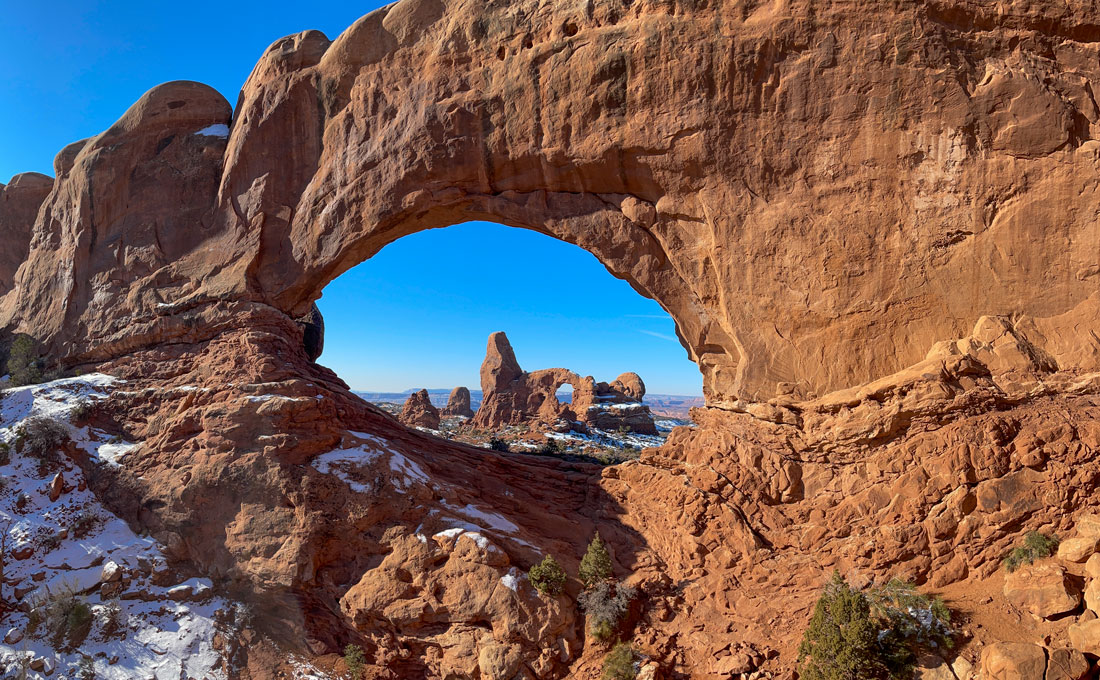
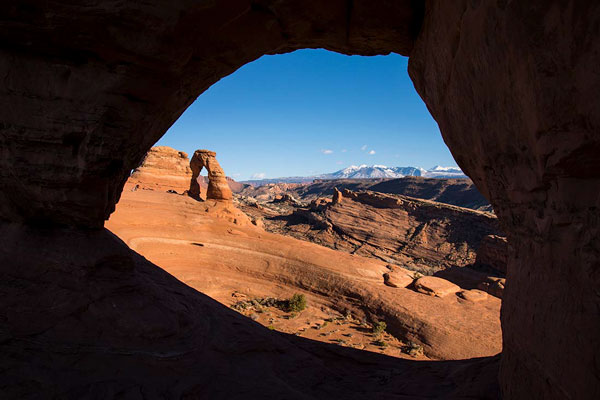
Sometimes the best photos of a Really Big Thing can be taken from moving away from it. This photo of Turret Arch was shot through North Window. Some of the best photos of large buildings can be shot from other tall buildings or landmarks.
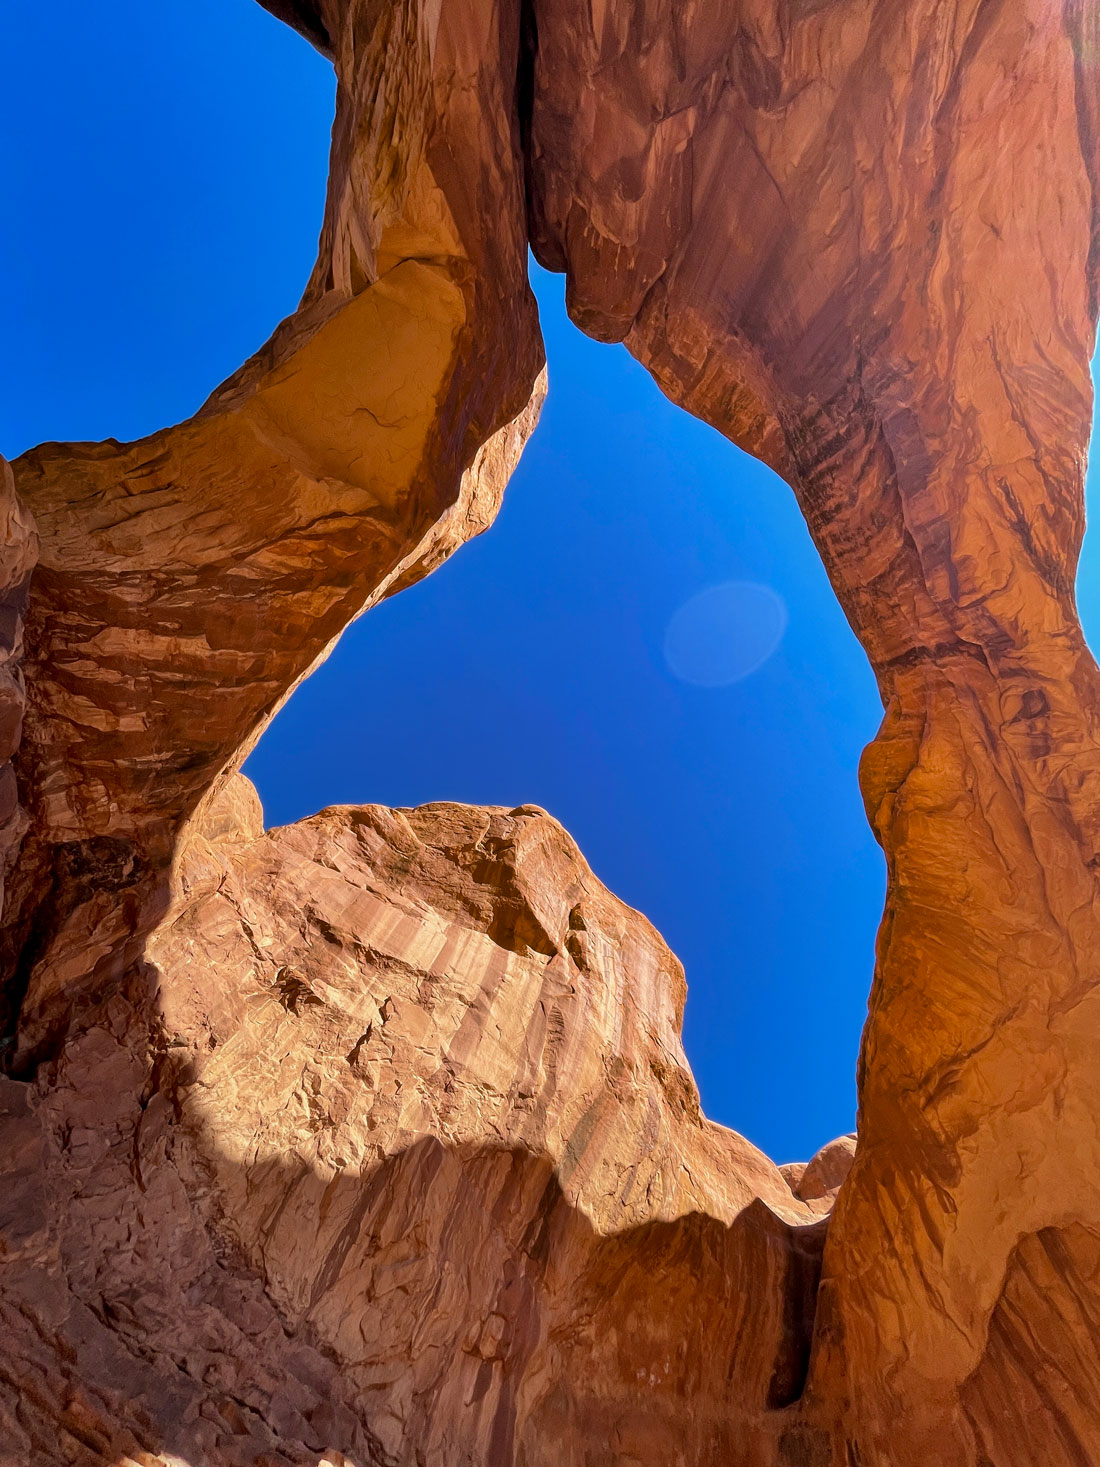
North Window and South Window were well lit at about the same time, so we were able to photograph them at the optimal time as well.
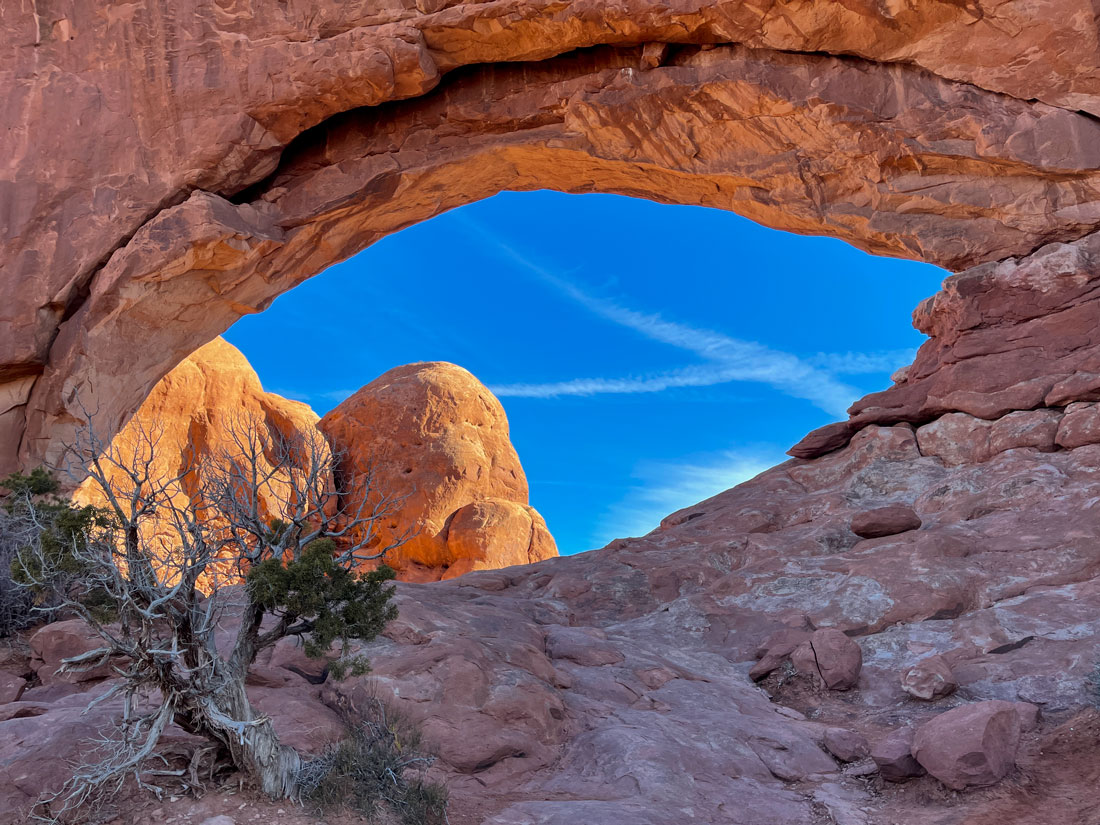
This photo of North Window was an opportunity to not only photograph the arch, but the influence of human activity - the crossing jet streams in the sky through the arch.
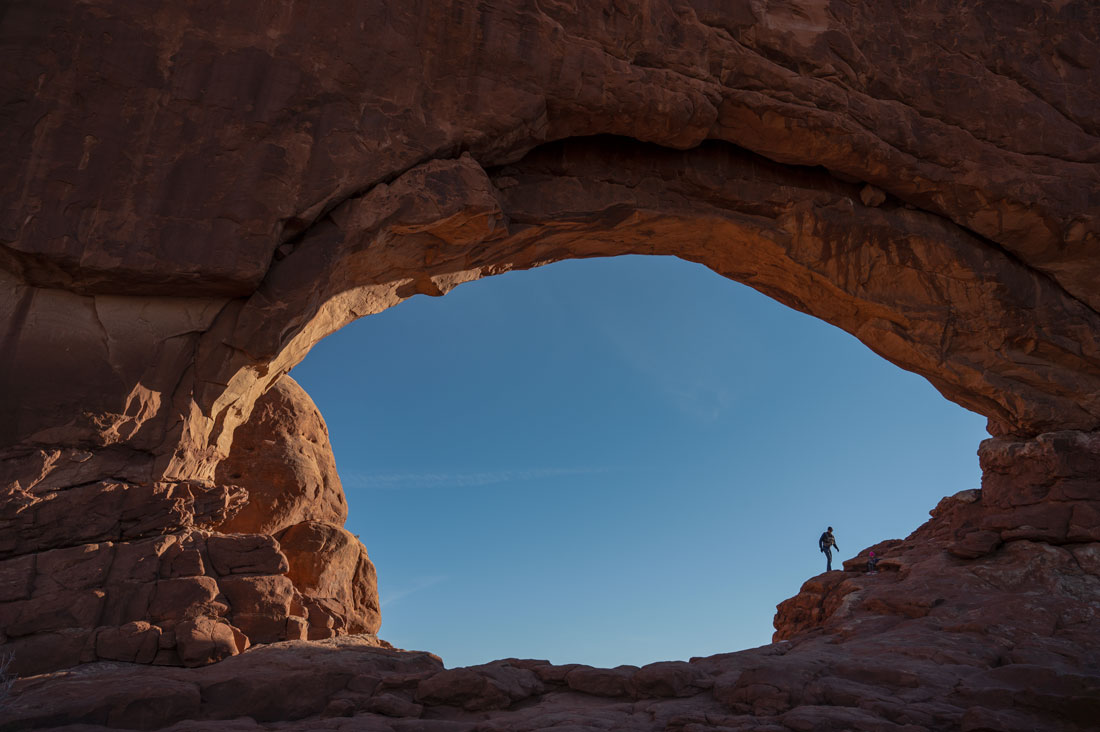
Backlit isn't always bad. This photo was a good opportunity to show North Window Arch's scale by capturing a silhouette of a climber in the window.
Double Arch – Our research indicated that the best time to photograph this site was at 11:15 a.m. to allow the sun to light the two arches that make up this 10-story cavern-style formation. We had just enough time after photographing the earlier three arches to hike to Double Arch and arrive at the optimal time for the light to hit it beautifully.
As we approached Double Arch, it was time to whip out the iPhone and do a panorama of the glowing formation that it is part of.
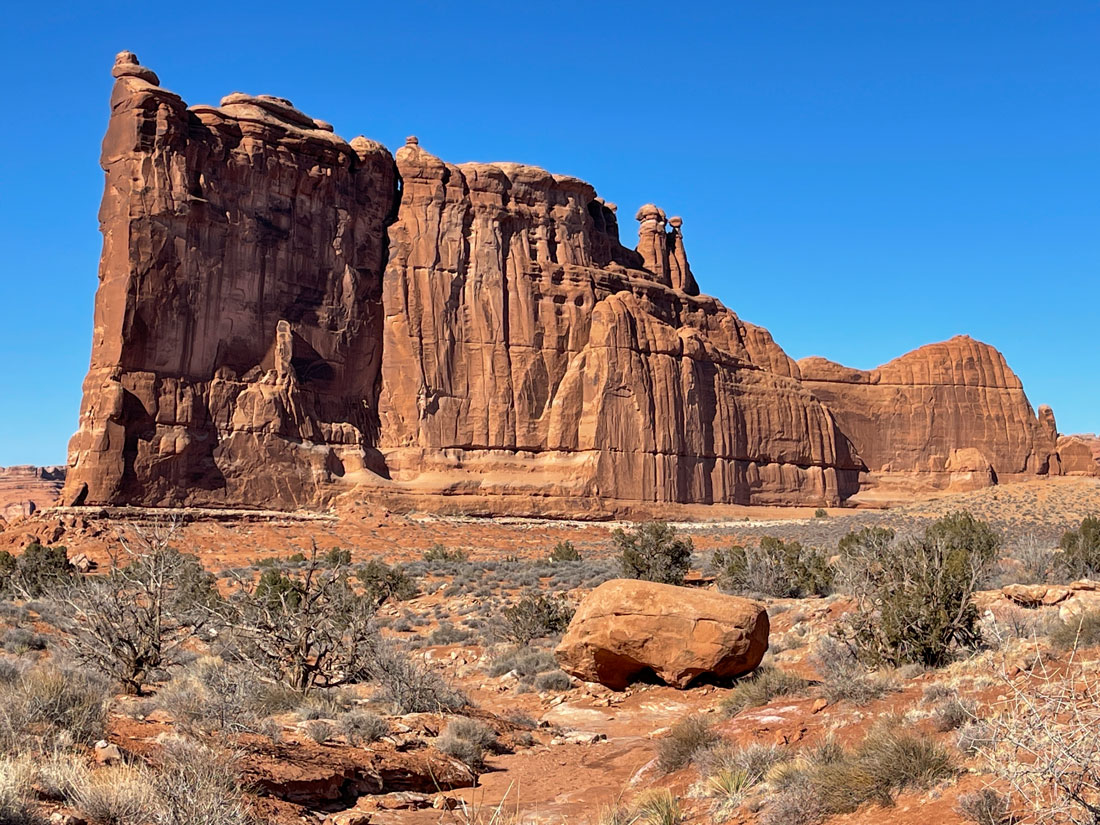
We then backtracked on the scenic highway toward the park entrance to a formation called Park Avenue. Park Avenue is a canyon trail with towering cliffs on both sides. If it is photographed too early in the day, the cliffs on one side are in shadow. If it is photographed in the afternoon, the cliffs on the other side are in shadow. Our goal was to get there at about 1 p.m., when the sun was high enough so that it shown directly between the cliffs, illuminating most of them on both sides with a minimum of shadows. Once again, it was a good time for an iPhone panorama.
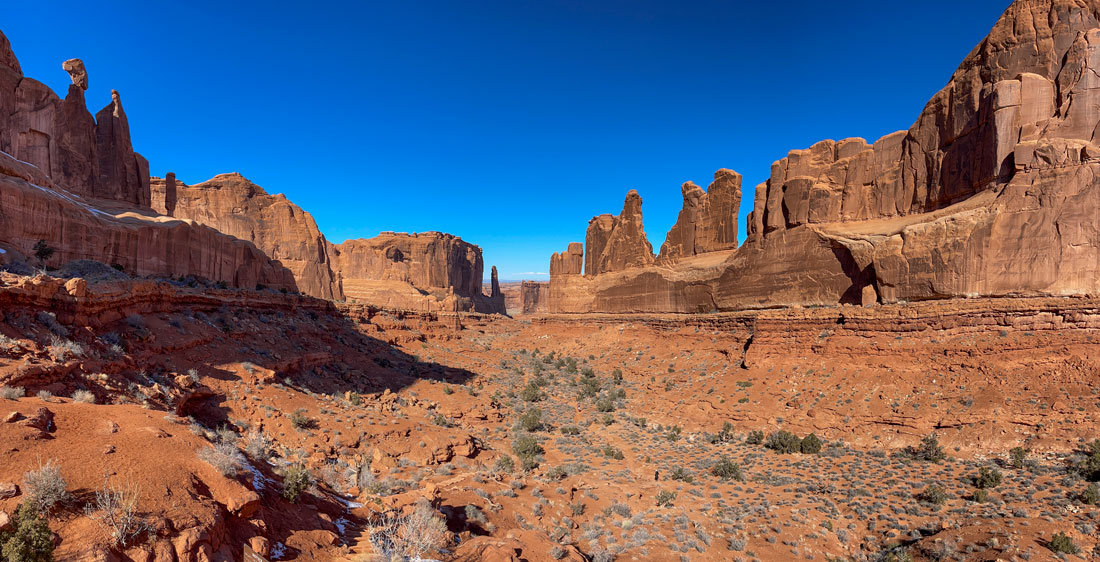
We allowed enough time to hike the canyon and back again – an easy 1.8-mile trip during which we had deep blue skies and glowing red cliffs on both sides. At the end of the trail are some of the park’s iconic formations – Courthouse Towers, the Tower of Babel and Three Gossips which also were lit beautifully at this time of the day.
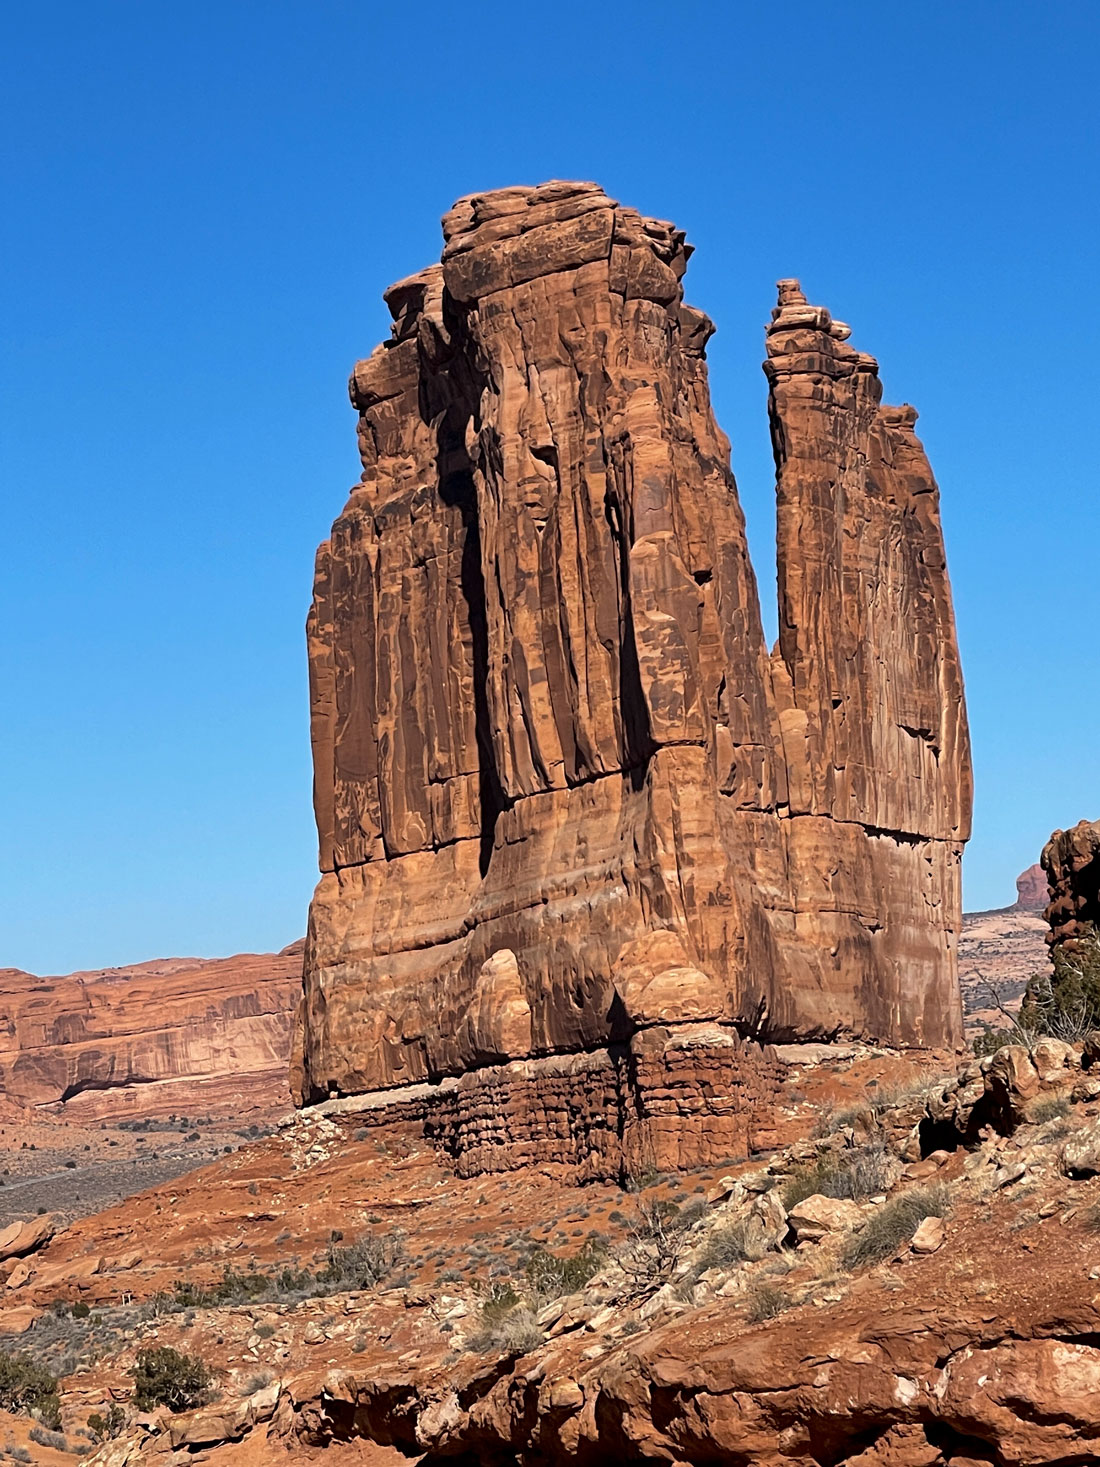
Courthouse Towers.
The Tower of Babel.
We then headed for the Fiery Furnace, a cluster of steep fins of red and white rock that jut up from the desert floor. The light on them was perfect at about 3 p.m. This photo of Fiery Furnace on the left and the La Sal Mountains behind it was a chance to create another panorama with the iPhone.
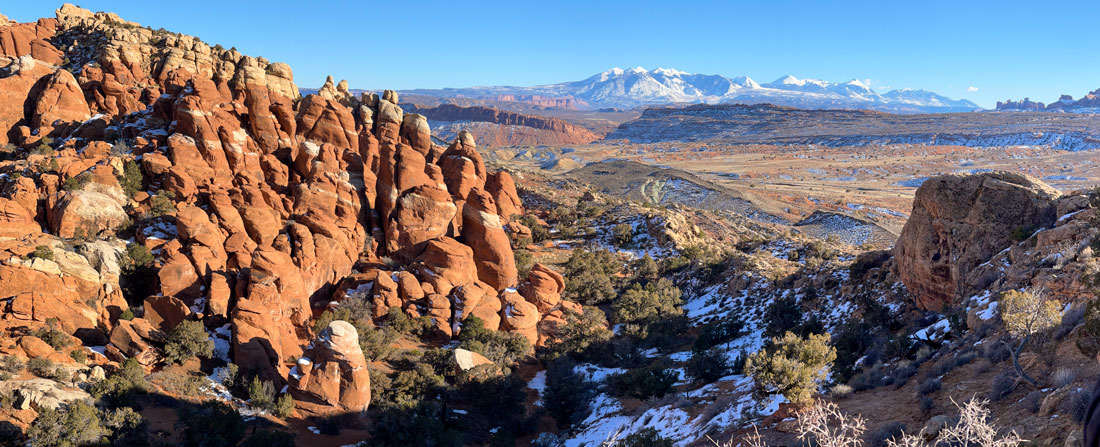
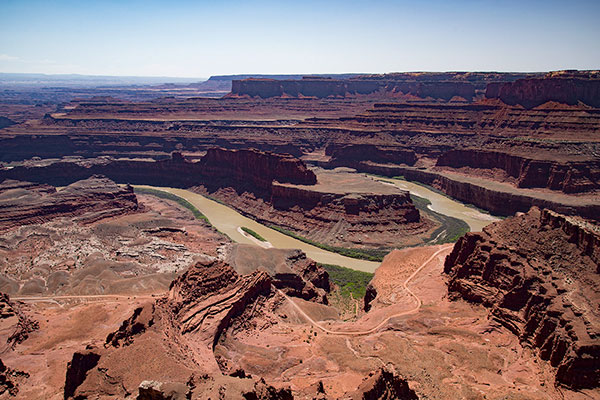
The light also was optimal to photograph the Salt Valley in which the Fiery Furnace formed 250-300 million years ago. A vast inland sea that covered the area dried up, leaving behind a massive deposit of salt several thousand feet sick. Then layers of sediment and windblown sand fused together into a solid mass. The fins that jut out in the Fiery Furnace are eroded remnants of this Entrada sandstone.
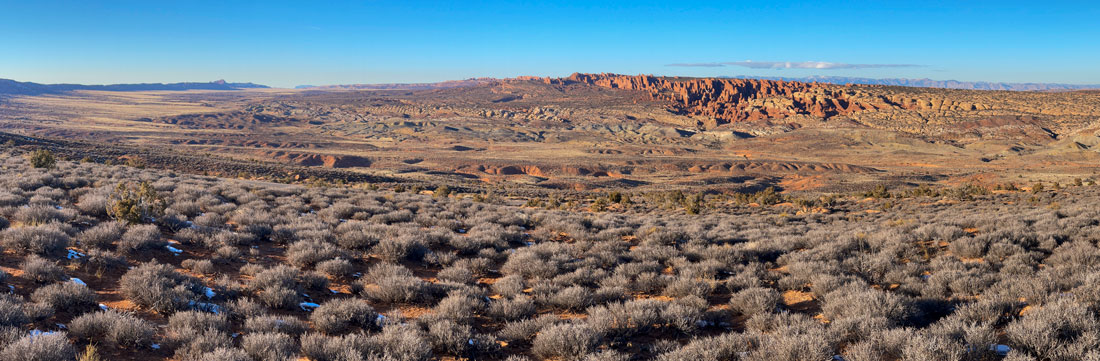
The fins of the Fiery Furnace today make up a natural maze of narrow passages with no trails, signs or cairns to guide hikers, and GPS does not work well amid the towering sandstone formations so the only access is via ranger-guided hikes and permits for experienced hikers. The Fiery Furnace gets its name from both the red appearance of the formations and the demanding hike and punishingly extreme temperatures in the location during the summer months.
On the way to and from the Fiery Furnace, we photographed the Ancient Sand Dunes. These are formations that began as sand dunes and hardened into stone. They were exposed when materials that subsequently covered them eroded away. The light at this time of day was low enough so that it provided definition for the dunes and the snow-capped La Sal mountains to stand out.
By the time we had photographed these features, the light was gone for the day.
We found that using this method of photo planning resulted in an exponentially higher percentage of well-lit, good-quality photos.
Recap:
- Watch the weather and plan to go on a sunny day.
- Determine the best vantage points to capture the features you want to photograph.
- Determine the best time of day when those features are lit by the sun.
Once you can get those parameters right, you can concentrate on taking quality photos of the subjects that tell their story. You don’t need a lot of gear – we took these photographs with a single Nikon camera and an iPhone. The iPhone is particularly useful for wide angle photos, panoramas, time lapses and video. Just because you are shooting with a smart phone instead of an expensive camera doesn’t mean you can’t get top quality photos. The iPhone captured stunning color which in some cases was better than the color in photos taken with the Nikon.
The scenario described above assumes that you can control conditions in a way that is not always possible when traveling. If you are on a tight schedule on a once-in-a-lifetime trip, you aren’t going to turn away from the chance to get the only photos you will ever get of the pyramids because your tour bus took you there at the wrong time of day or of Windsor Castle because it was foggy when you went there.
The best way to handle these situations is still advance planning. When you are planning your trip, collect a few good sample photos from the internet of the pyramids backlit or the castle on a foggy day to give you an idea of how to photograph those sites well in less-than-optimum weather or lighting conditions. If the weather and light are bad when you show up, you still will have some ideas as to how to work with the conditions and take nice photos. Rain, for example, can help make beautiful photos of Really Big Things because the water can saturate colors on stone. Storm clouds can make dramatic photos over Really Big Things and fog can lend an air of mystery. If all else fails, you can always take a few overall shots and then move in close and shoot details.
We have found that the “point and shoot” approach can result in disappointing travel photos, whereas a bit of advance planning can vastly improve not just the quality but the meaningfulness of both our travel experiences and our photos. When we take the time to photograph things better, we also take the time to see them more deeply and clearly. This makes travel richer and more satisfying as well as providing a visual record of the experience.
More photos of Arches National Park
Check out these related items

Seeing the Big Picture
We are living in the Great Age of Panoramas, with super wide angle photography permeating our everyday lives.
How To Archive Your Photos
Globally, we all take some 1.44 trillion photos annually. Far fewer get organized and archived. Here's how to organize yours.
For the Love of Arches
Arches National Park in southeastern Utah is being loved to death, and the park service is scrambling to manage the attention.
Visit Utah’s National Parks
Utah state and local governments and organizations are chipping in to keep national parks operating during the government shutdown.