How To Archive Your Photos
Photos by Forrest Anderson; Graphics by Donna Rouviere Anderson
We upload them, email them, share them, print them, add them to reminders. We put them on mugs, pillows, T-shirts and in albums, books and apps. Some 1.44 trillion photos will be taken in 2021. The one thing we don’t do so much is archive our photos.
Most of us have photos scattered on our phones, Facebook, hard drives, cloud services, DVDs and older ones in boxes. The overwhelming majority of these photos are not captioned or organized, making it impossible to search and use them.
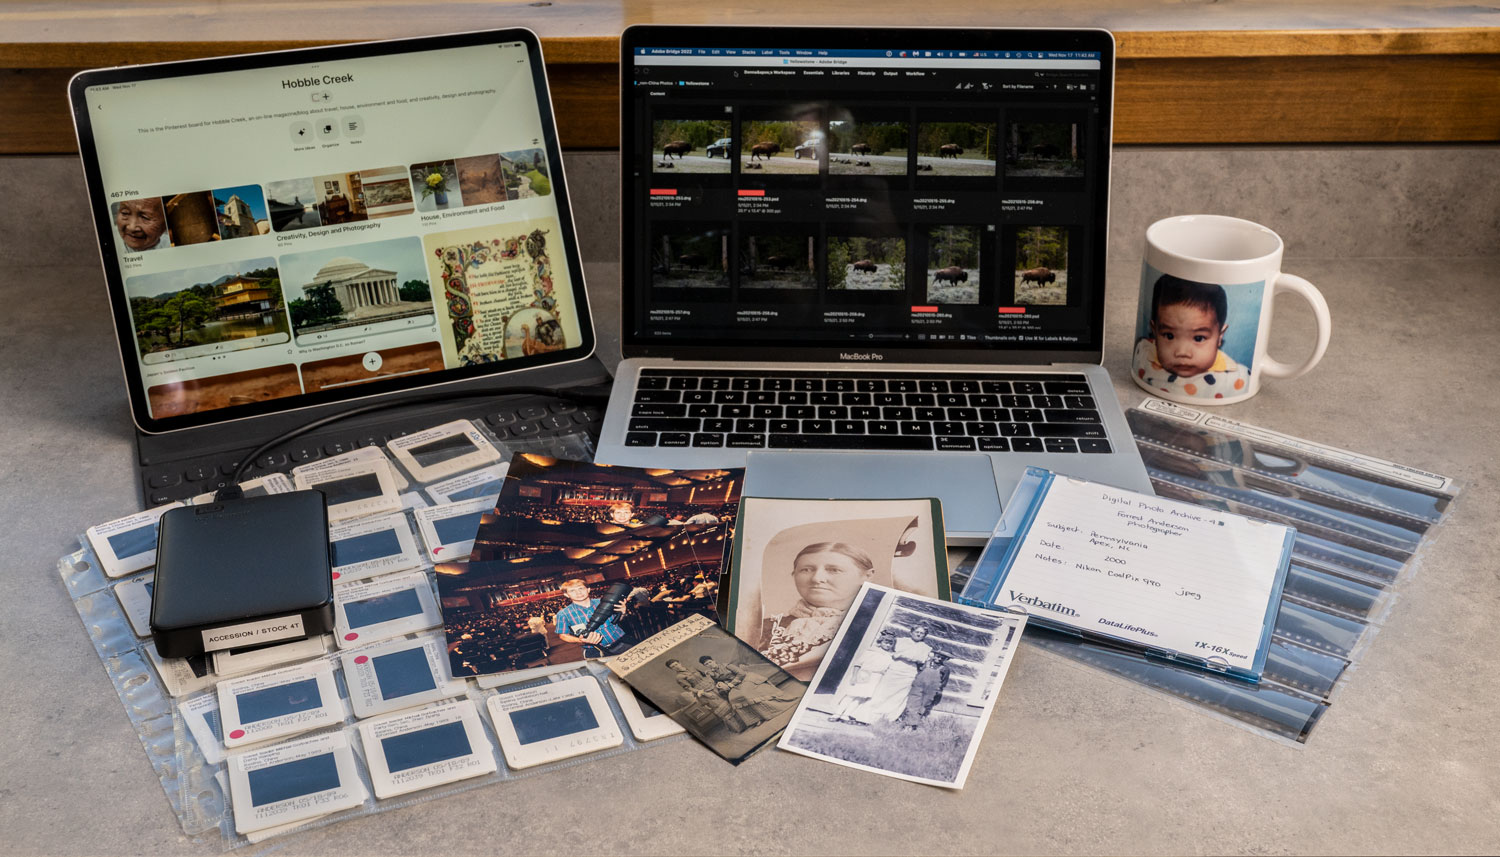
The good news is that staying home more during the pandemic has provided a once-in-a-lifetime chance to get organized. For us, that meant finishing the organization of a professional collection of more than 100,000 photos created over decades by my husband, international news photographer Forrest Anderson.
The Challenge
Photographs are among the most difficult and time consuming objects to archive. They come in many different formats and media, from a wide variety of prints, negatives and slides to various digital formats and even 3D objects on which they have been printed.
Unlike written documents, most of which have content that is at least partly self explanatory, photographs have to be captioned individually with “what, when, who, where and why” information.
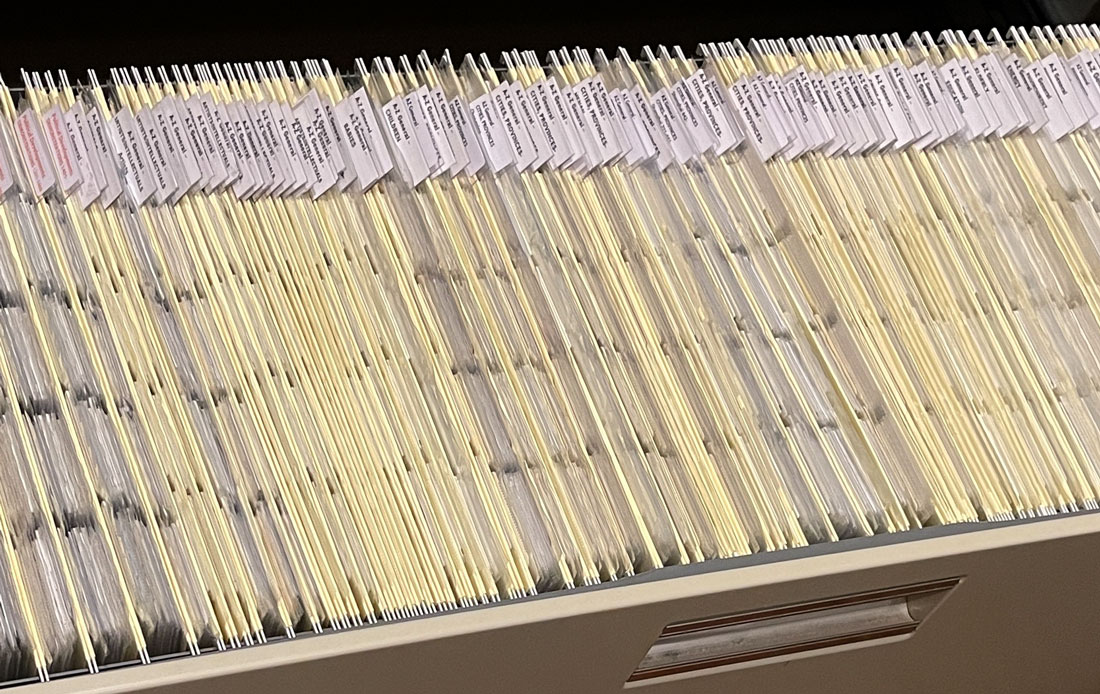
Print and slide photos are fragile and perishable, so they need to be stored carefully in acid-free folders away from extreme temperatures to prevent them from deteriorating. They have to be kept away from dust that could cling to their surfaces.
To make prints and negatives part of a digital database, they need to be scanned.
Both scanned photos and ones that originally are digital need to have metatagging and keywords added for them to be searchable in a digital database. They also need to be backed up, because computers and hard drives regularly fail or becoming obsolete.
How Did We Get Into This Mess?
Creating and maintaining a good archive of our photo collection has been an on-going challenge for all of these reasons and also because the workflow of international news photography tends to work against attempts to maintain a good archive. This is the case with most photo workflows, not just ours.
With news, as with many people’s social media posts, the top priority is getting photos of an event published quickly. For example, Forrest worked in China for more than a decade for Time magazine. He would shoot an event or other assignment and immediately send the unedited photos to Time in New York. Time photo editors would go through the photos and select the ones they wanted for publication or later use, then send the others on to a New York photo agency for redistribution. The agency, Gamma-Liaison, typically copied the photos, theoretically captioned them, and sent some of them on to U.S. publications while sending the copies to Paris, France, for distribution to European publications. The photos went to publications in 55 different countries.
Under the agency’s agreement with the publications, the originals were to be sent back to the agency after one-time publication. Occasionally, the agency also would send surplus photos that it already had versions of back to us so we could archive and resell them on our own. In practice, it took months or years for some publications to return photos to the agency or they would never be returned if a publication went out of business.
When the photos returned to the agency, they were theoretically archived so that they could be resold in the future. However, the agency in practice was way behind on archiving. It also had not always captioned photos before distributing them. (Does this sound familiar?) As a result, many photos sat at the agency or publication offices for years uncaptioned. When the agency owner died, the photos were shipped back to us and other agency photographers. They arrived in boxes that looked like their contents had been dumped in and stirred up with a broom handle. Pollution photos were mixed with education ones and ones of political demonstrations with those of government meetings or leaders of countries. Photos from all different times, locations and assignments were together willy nilly. It was a photo archivist’s worst nightmare.
Thus ensued years of efforts to organize and archive the photos, culminating in us finally finishing them during the pandemic.
What We Learned
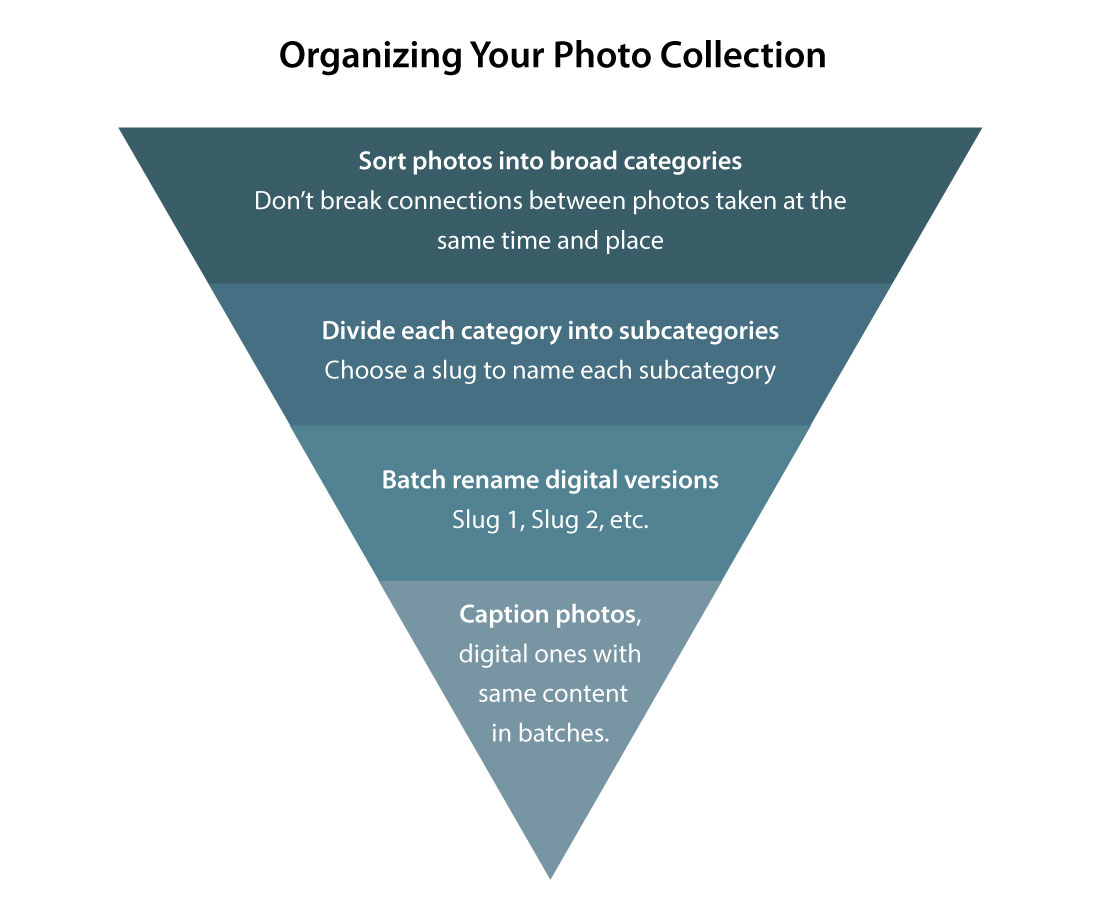
For non-digital photos, don't succumb to the temptation to start by scanning them. Instead, begin by sorting the photos into broad categories that make sense, taking care not to separate photos that might have a natural connection with each other. For example, we sorted photos into broad categories such as government, religion, economy, historical sites, etc. For a personal collection, you might want to sort by branches of your family, decades, or topics such as Vacations.
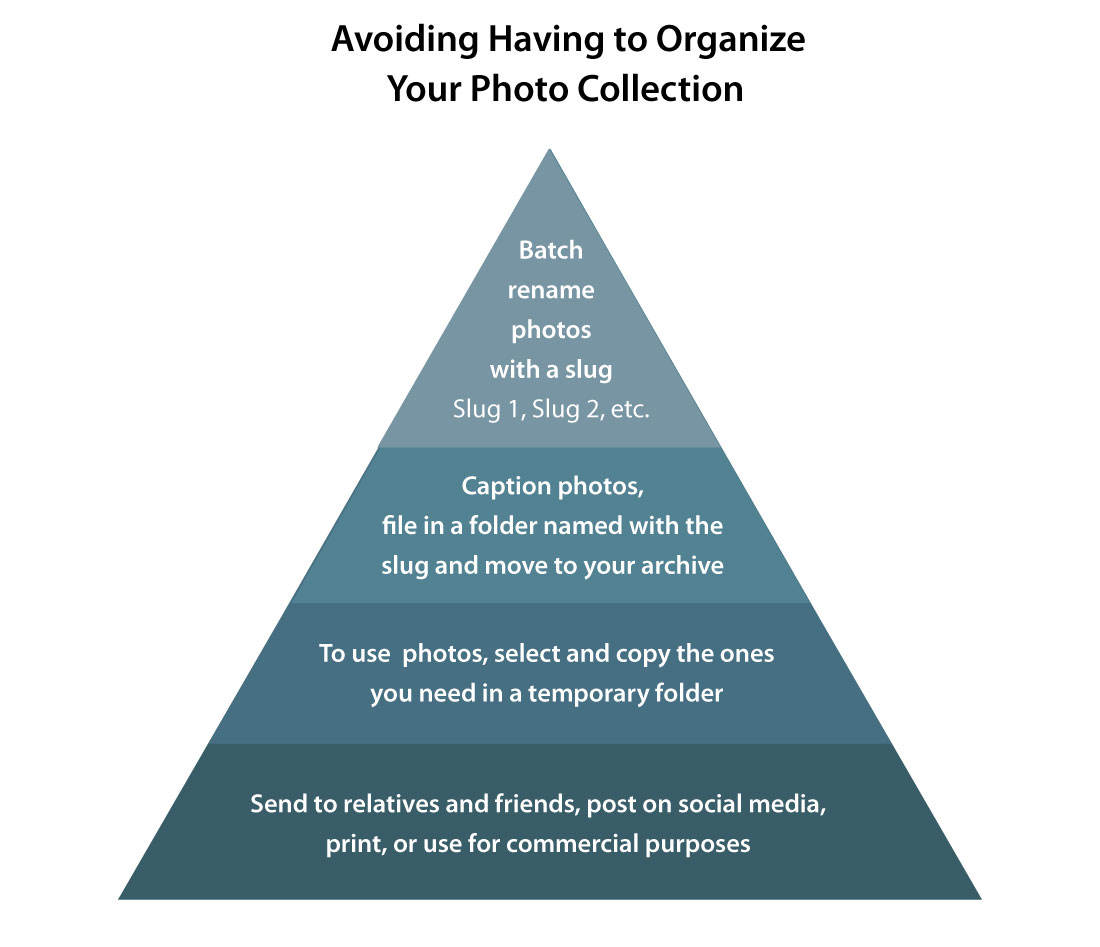
From that point, our organizing become progressively more specific, like an inverted pyramid. We next broke broad categories into separate smaller ones. For example, photos in the Health category could be broken down into Newborn Babies, Chinese Medicine, Acupuncture, Eye Surgery and other specific topics.
When we remembered when and where some events had occurred and who was in the photographs, we separated those photos out and placed them in their own labeled container (a box for many photos, a file folder, or a computer file if they were digital). We could recall where others were taken, so they could be placed together by location. Other photos were more generic – for example, a crowd of people bicycling down a city street in China. We placed those by topic in containers with labels such as Transportation, Children, Health, Religion or Education. Placing the photos in such containers ensures that if we dropped dead before we got the photos captioned, our heirs would at least know something about the photos.
After organizing the photos into subcategories, scan them by container if they aren’t already digital.
For each subcategory, choose a 1-5 word name, called a slug in journalism, that describes the category. For an event, that could be “Ann Marie Jones birth” or “Disneyland 2015.” For a subject, it could be Birds or Railways. That slug will follow the photos through your entire archive system and be searchable in your digital database. It will be the name on the file folder, digital or analog, that holds the photos. Use it to batch rename digital photos in that folder – for example Disneyland 2015 1, Disneyland 2015 2, etc.

This screenshot shows the organization of a file of photos of China's former leader, Hu Jintao, in my computer. In our China photo archive, the major category Chinese Leaders has a subcategory with the slug Hu Jintao. Inside it is photos of Hu Jintao with the slug Hu Jintao and number as the name of each photo. This system makes it easy to navigate to photos of the former leader as well as to search the computer for photos.
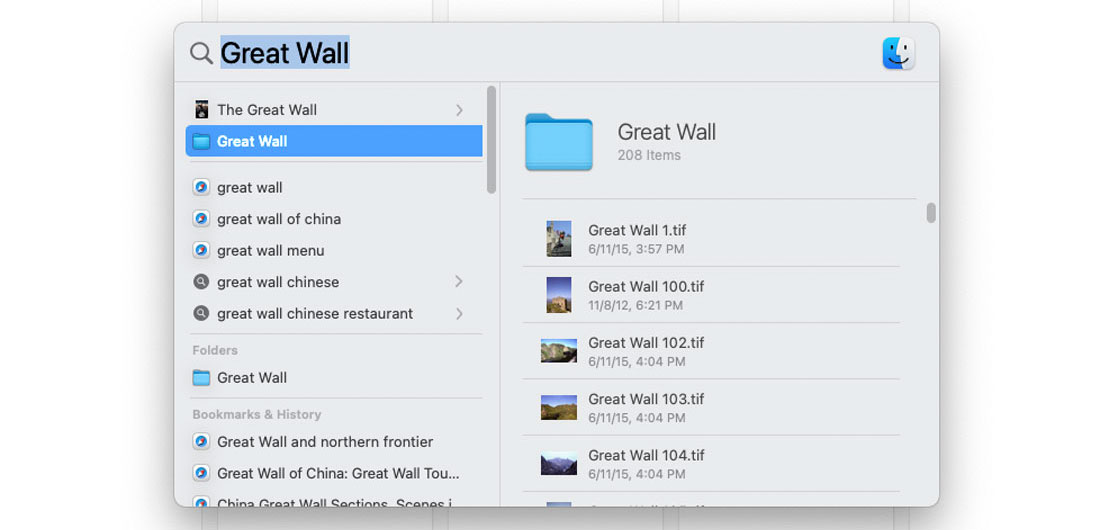
This screenshot shows a search for photos of the Great Wall by using the slug Great Wall, which brings up the folder by that name and the photos inside it.
For prints and slides, order the slides in each subcategory file, scan them and batch rename the scans with the file slug in this manner.
Captioning
Photos should be captioned on the individual photo, so that if they are removed or lost from a file, any viewer can see what the photo is about. For a digital file, do this in a computer application with metatagging capability. If you have scanned the photos in an order in which many of adjacent ones have the same caption, you can batch caption by those by first selecting them and then writing one caption for all of them.
For a print, write the caption in pencil only (no pen) on the back so it won’t damage the print and could be erased. For slides, create slide label captions in Microsoft Word, print them out and stick them on the slides.
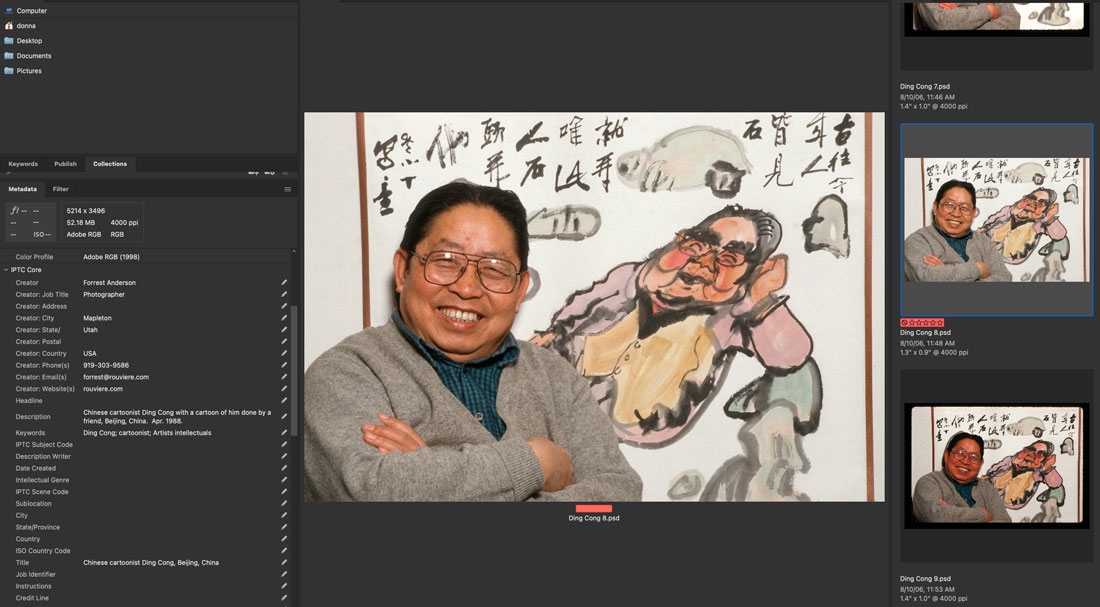
These photos of Chinese cartoonist Ding Cong are each named with a slug, Ding Cong, and a number. They are stored in a file called Ding Cong under a broader category of Artists, Intellectuals. On the left, you can see in the description that the selected photo is captioned with his name, information about the circumstances and the date. The ideal is to include the month, day and year, but if you only know the month or the year, include that. If you aren't sure, try to put at least the decade, such as 2010s. Always write out the month, at least in a three-letter abbreviation such as Jun. or Jul. rather than the number, as just writing months in numbers can confuse other people. (Forrest and I had a long standing disagreement about this because he preferred to write the number of months. The dispute ended when he showed up at an event in Singapore and was presented with a birthday cake on May 12. His birthday is on Dec. 5, but he had written the month numerically on a document that the staff handling the event had received. They had noticed the date, but since months and dates in Singapore were commonly swapped in order from the way they are written in the United States, they had thought it was his birthday and ordered the cake. Henceforth, we have always written out the month, abbreviated, on photo captions to make sure that it is understood.)
Negatives can be captioned by writing the captions by frame number on a piece of acid-free paper and then sliding it with the negatives in an acid-free sleeve into a file folder labeled with the slug. If possible, scan at least the best of negatives and include them in your digital archive as well.
The caption can be brief, but it should include “who, where, what, when, why” information about the photo’s contents. Full names should be used, not “Mom and Dad” or “Bob and Amy.” Say who is in the photo, where, and if necessary why they are there. Then end with the date. Here is an example:
“Elijah Adams McGregor and his wife Ella Johnson McGregor at their ranch, Powderhorn, Colorado. Jan. 15, 1890.”
When people have middle names, use them, as there can be multiple people in a family with the same name. One branch of my family has 14 Joseph Combaluziers. If you know the relationships between the people in the photo, it can be helpful to add information about that. If you know the occasion for the photo, add that. The key is not to assume that whoever inherits the photos will know what the content of the photo means.
Captioning photos can be very time consuming and tedious, so it’s a perfect time to fire up Netflix and listen to a favorite movie or television series while you caption away. It's a good idea to schedule time over weeks or months to caption photos, as it is unlikely you can finish them quickly.
What About Mystery Photos?
Set those aside and deal with them after you get the rest of the photos captioned. We started our project with boxes of mystery slides, but ended up with almost none because by the time we got the other photos organized and captioned, we had figured out where most of the mystery photos fit in. Don’t throw away mystery photos – I held on to a tintype that had written on it, “Henry Knoll's baby picture,” years before finding out that a great great aunt had been married to Henry Knoll, a train engineer.
The best way to store print and slide photos is in acid-free sleeves/slide holders in acid-free hanging folders. I like to use the ones that have plastic tabs that can be added or removed. I use acid-free labels on them.
How To Avoid Captioning Photos
By the time you finish organizing the photos you have taken or inherited, you’ll be ready for a plan to avoid having to do a repeat performance in the future. It’s infinitely easier to organize and caption photos as you go. Here’s how:
Only take digital photos. Some camera buffs are nostalgic about using film, but from an archiving perspective, digital photos are infinitely easier to keep organized in a searchable database.
Reverse the organizing pyramid by renaming photos from an event or location with a slug as soon as you take them and download them to your computer, placing them in a folder with the slug as a name, captioning them right away, and filing the folder in your photo archive.
This goes against the standard approach of taking a photo and immediately posting it on social media, but it can save you oodles of time and frustration later if you discipline yourself to go through this process before using the photos for any purpose. Select and copy those you want to put on social media, send to family, use for business and other purposes or print. Work with this temporary copy file, knowing that your original photos are safe in your photo archive, all captioned, and you don’t have to worry about organizing them in the future. Storing precious family photos on social media sites is risky, as you could easily lose them if the site goes out of business or something goes wrong with your account.
We typically use a set of photos multiple times in our business – for an original photo assignment, posting them on our website for stock photo resales or sending them to Getty Images for resale, using them in blogs, books or apps and on social media. Starting our workflow by renaming, captioning and archiving the photos right after taking them makes a massive difference in our overall productivity.
Back Ups
Last step: Back up your digital photo archive to at least one other hard drive besides your computer. This is easy if you have all of your photos together in one folder called Photo Archive. We back ours up to two hard drives. We back up one of the hard drives every time we bring new photos into it. The other backup hard drive is stored in a bank safe deposit box that we update every few months. With three copies, when we have a hard drive or computer fail and have to replace it, we easily migrate our photo archive to an updated model.
Continuously migrating digital photos from older to new machines as you acquire them is the best and easiest way to ensure that they will be preserved. It also is a good way to preserve copies of older photos, because old prints fade, and if you have scanned them and continue to migrate the digital scans to new media, you will preserve unfaded versions of your photos.
Check out these related items
Making Your Own Family Museum
Making a family museum is a perfect way to teach your family about your heritage in a fun way.

Organizing Family Heirlooms
Now that many of us have cleaned out our closets, we need to store heirlooms, photos and documents properly. Here are some tips.

Seeing the Big Picture
We are living in the Great Age of Panoramas, with super wide angle photography permeating our everyday lives.